출처 :
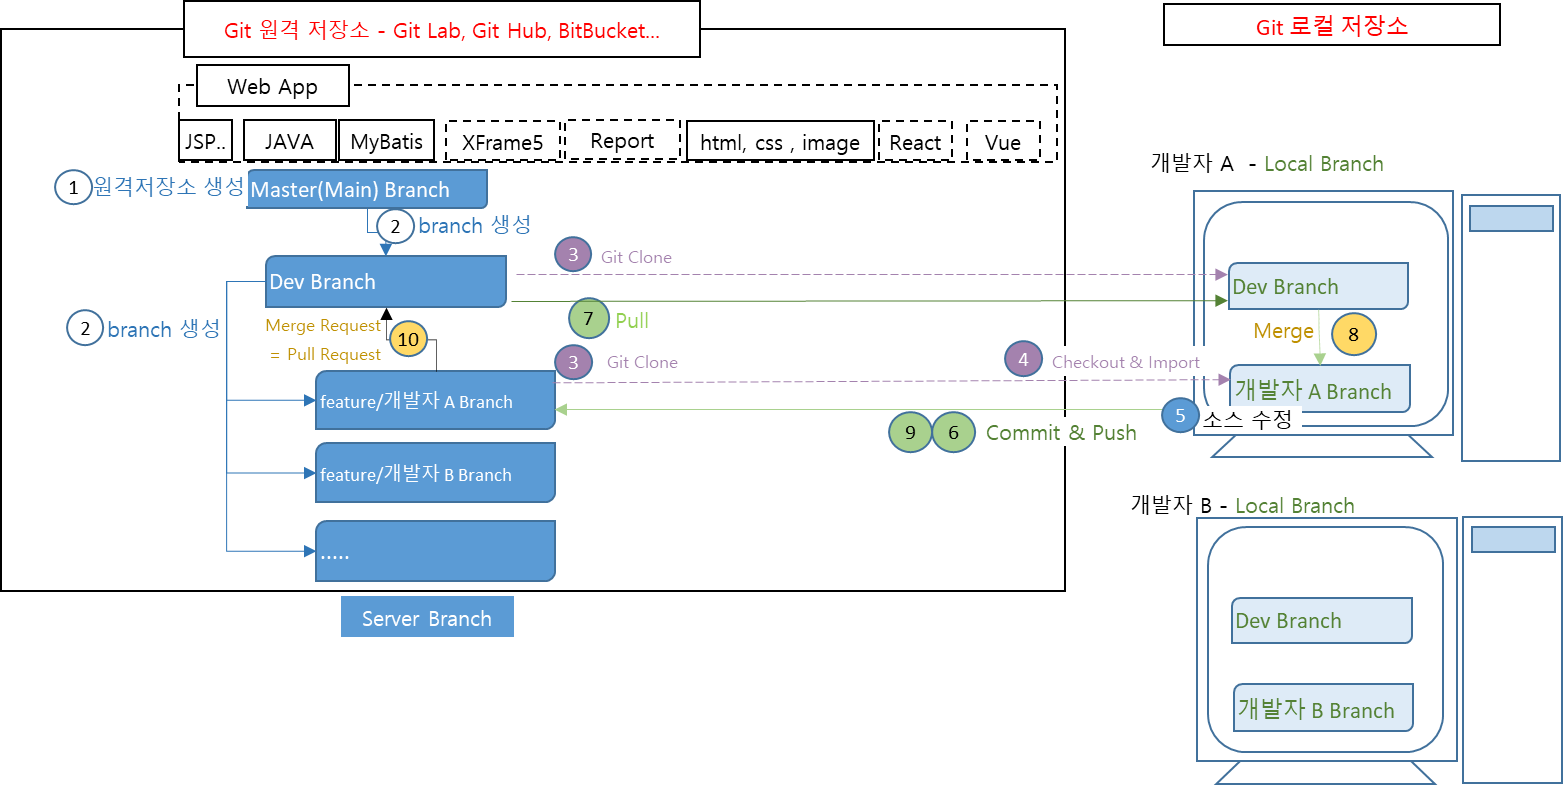
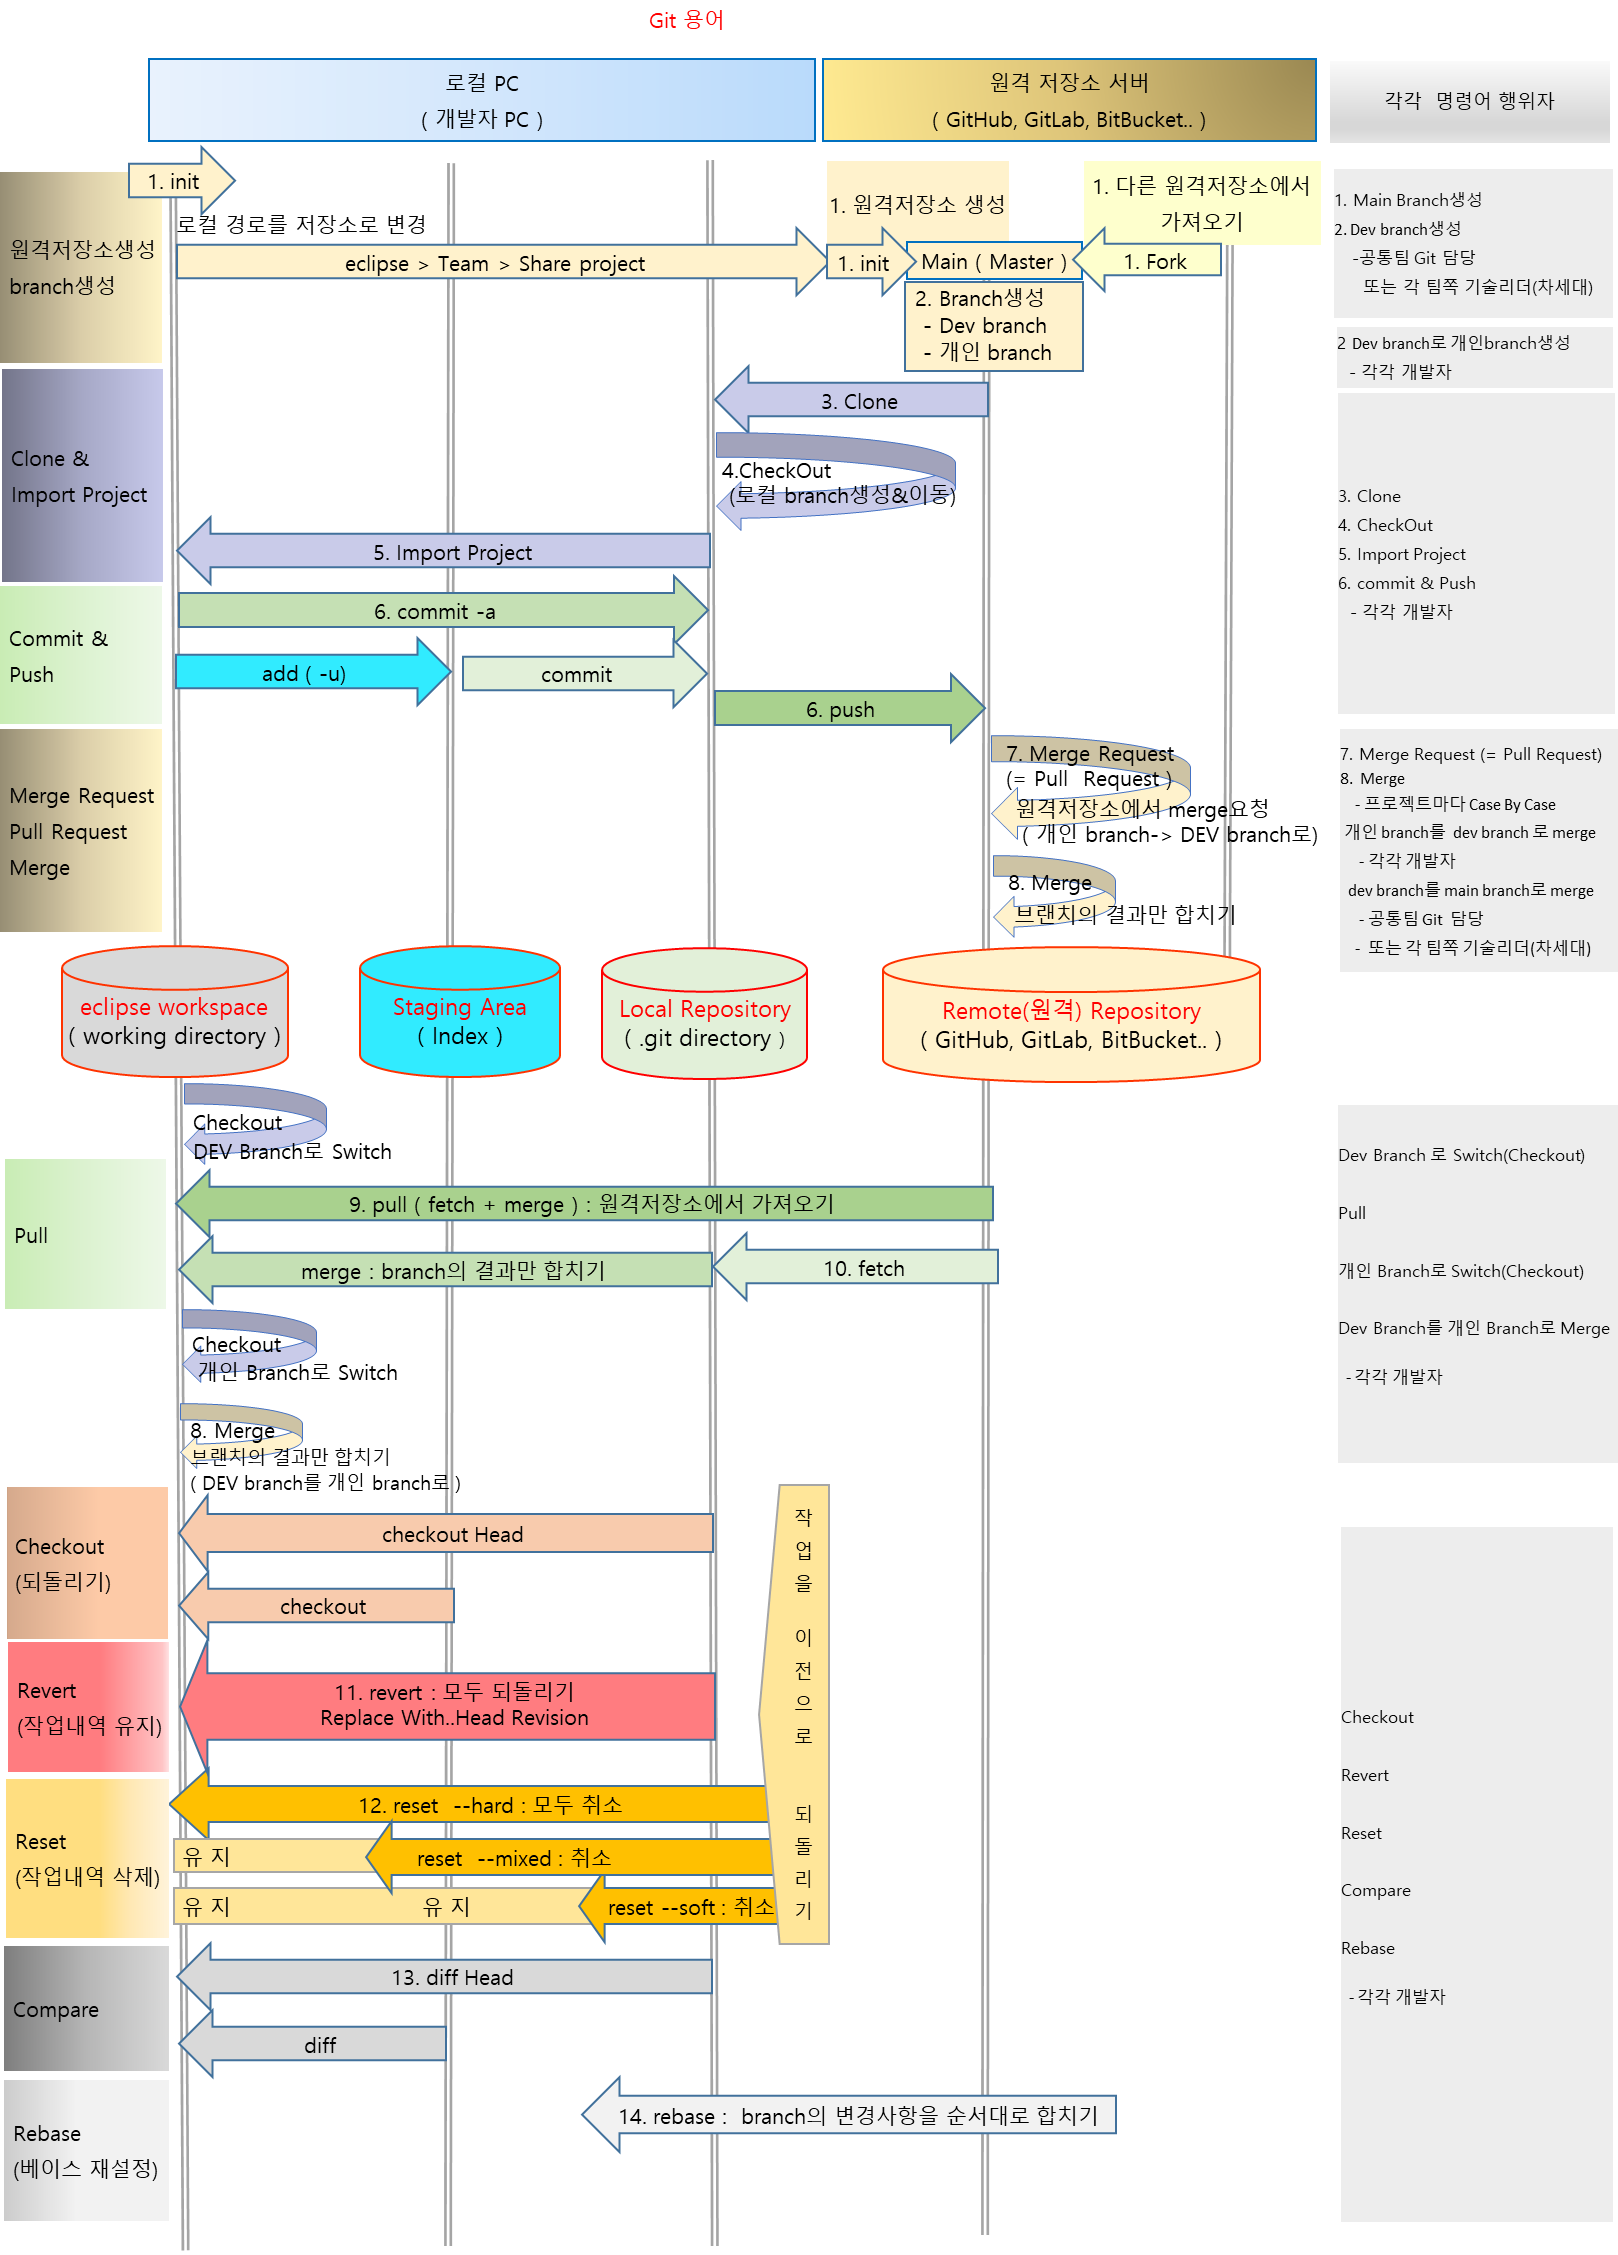
Git Branch & Git Clone & Checkout & Import & Pull & Commit & Push & Merge
아래 내용은 친구아들에게 설명을 쉽게해주기 위해 인터넷 검색하면서 나왔던 git 내용들을 짜집기해서 정리한 내용입니다.
@mirheeoj 님이 제안해 주신  각각 명령어에 대한 행위자를 넣어봤습니다.
그런데  프로젝트에서는 Case By Case일수도 있습니다
특히
    7. Merge Request (= Pull Request)  부분은
     > 개인 branch를  dev branch 로 Merge Request-> merge
         - 각각 개발자

     > dev branch를 main branch로 Merge Request-> merge
        - 공통팀 Git  담당
        -  또는 각 팀쪽 기술리더(차세대)
와 같이 나누어 질수 있습니다.
0.기본용어
  (1) Git 원격저장소 서버
     1) Github
       : <https://github.com/>
     2) Gitlab
       : <https://gitlab.com/>
     3) Bitbucket
       : <https://bitbucket.org/>

 (2) 작업 폴더(Working Directory)
    1) 작업이 일어나는 폴더

 (3) Staging Area ( Index )
    1) 작업 폴더에서 작업한 변경 내용을 기록 하는 곳
    2) git 저장소에 commit하기 전에 올려두는 공간
    3) cmd에서 add : 작업폴더에서 Staging Area에 add
     $ git add -A
     $ git add .
     $ git commit -m "파일들 수정 완료 "

 (4)  Local Repository (로컬 저장소)
    1) 내 컴퓨터의 git 폴더
    2) cmd에서 commit  : Staging Area에서 로컬 저장소로 commit
     $ git commit -m "파일들 수정 완료 "

 (5) Remote Repository (== 원격저장소, Origin )
    1) 원격저장소 서버의 git
    2) cmd에서 push : 로컬 저장소에서 원격저장소로 push
     $ git push {원격저장소 이름} {원격저장소로 push하과자하는 브랜치}
     $ git push origin main

 (6) init
    1) 로컬 경로를  저장소로 변환

 (7) main or master(메인)
     1) 원본 , 출시용 브랜치

 (8) Head
    1) 현재 작업중인 branch
    2) 현재 작업중인 브랜치의 최근 커밋된 위치

 (9) origin : 원격저장소 이름
     C:\Users\supekss\git\egov01 > git remote -v
        origin <https://[email protected]/supekss/egov01.git> (fetch)
        origin <https://[email protected]/supekss/egov01.git> (push)

     C:\Users\supekss\git\myandroid> git remote -v
         origin <https://github.com/supekss/myandroid.git> (fetch)
         origin <https://github.com/supekss/myandroid.git> (push)

     C:\Users\supekss\git\myProject01> git remote -v
         origin <https://gitlab.com/supekss/myProject01.git> (fetch)
         origin <https://gitlab.com/supekss/myProject01.git> (push)

1. 원격저장소 생성-  Main(Master) 생성
   (1) git 원격서버 - github,gitlab, bitbucket....
	1) github
	    <https://github.com/>
	        top repository
		Create a new repository
	2) gitlab <- 인덕원
	    <https://gitlab.com/>
	        new Project
	3) bitbucket
	   <https://bitbucket.org/dashboard/overview>
	     Create Project
	         Create repository
  (2) init : 로컬경로를 저장소로 변환

1. fork
   (1) 다른 프로젝트의 저장소에 들어있는 모든 내용을 복사해 와서 자신의 저장소를 만드는 작업.
   (2) GitHub에서 다른 이의 작업물을 복사하는 과정.

2. branch생성
  (1) git Main(Master)을  가지고 각각 브랜치 생성
  (2) GitHub , GitLab , bitbucket
      1) new Branch
         dev branch생성
         feature/supekss branch생성
  (3) cmd 에서 branch생성
       $ git branch dev
       $ git branch feature/supekss

3. Git Clone
   (1) remote 에서 local로 저장소(프로젝트) 가져오기(복제하기)
   (2) 새로 생성한 프로젝트 (init, fork...)를 로컬로 가져오기
   (3) GitHub , GitLab , bitbucket
        해당 Git 선택후  git clone...
   (4) 해당 IDE(eclipse, sts4, vs code, intellij IDEA) 에서 clone
       eclipse > git repogistory > Clone a git repogistory 선택
   (5) cmd 에서 clone
       $ git clone { 원격 저장소 URL } - 원격저장소 전체
       $ git clone <https://github.com/supekss/myandroid.git> - 원격저장소 전체
       $ git clone -b { 브랜치명 } { 원격 저장소 URL } - 특정브랜치

4. Check out
  (1) remote branch를 local branch로 만들고  이동(전환)
  (2) branch 이동(전환)
  (3) 내용 되돌리기(Restore)
  (4) 해당 IDE(eclipse, sts4, vs code, intellij IDEA) 에서 checkout
     eclipse > git repogistory > 프로젝트 선택 >  remote tracking > 해당 branch 선택
       > Check out   > Check out as new local branch 를 하면   local branch생성
  (5) cmd 에서  checkout
     $ git checkout -b feature/supekss - 로컬 브랜치 생성과 이동하기(checkout)
     $ git checkout feature/supekss - 브랜치 이동하기(checkout)

  (6) Check out : branch만들고 전환,branch전환 또는 내용 되돌리기(Restore)
       => 특정 Branch로 이동하기
            $ git checkout {Branch Name}
       => 특정 Branch 생성 후 해당 Branch로 이동
            $ git checkout -b {New Branch Name}
       => 특정 branch 에서 파생 branch로 만들어서 해당 branch로 이동
            $ git checkout -b {Branch Name} {Base Branch Name}
       => 모든 변경 사항을 취소
            $ git checkout .
            - 대상: 아직 add / commit 되지 않은 내용 (Working Directory에 있는 변경 내용)
             되돌리고 싶은 파일은 추적 되고 있어야 한다.
            - checkout으로 지워버린 내용은, commit하지 않고 지운 내용이기 때문에 다시 복구할 수 없다.

       => 특정 파일에서 작업한 내용 삭제
            $ git checkout -- {File Name}
            - 대상: 아직 add / commit 되지 않은 소스 (Working Directory에 있는 변경 내용)
            - 추적되고 있는 파일명이어야 한다.

       => 특정 Commit 버전으로 전환
            $  git checkout {Commit Hash}
           - 아직 Commit 하지 않은 내용이 있다면 전환되지 않는다.

5. Import project
  (1) 이클립스 에  프로젝트로  import 하기
  (2) 해당 IDE(eclipse, sts4, vs code, intellij IDEA) 에서 import project
      eclipse > git repository (Show View) > 프로젝트 선택
         > import Project

6. Commit & Push
  (1) 로컬에서 원격 저장소 서버로 반영
  (2) add : 작업 폴더에서 작업한 변경 내역을 stage area에 올릴 때 사용
  (3) commit : 스테이지에 추가한 수정 파일을 git add 명령어로  git 로컬 저장소에 저장
  (4) push : commit한 파일을 원격 저장소에 올리는 명령어
  (5) 해당 IDE(eclipse, sts4, vs code, intellij IDEA) 에서 add,commit,push
	eclipse >  Git Staging View

  (6) cmd에서 add, commit, push
     $ git add -A
     $ git add .
     $ git commit -m "파일들 수정 완료 "
     $ git push {원격저장소 이름} {원격저장소로 push하과자하는 브랜치}
     $ git push origin main

7. Pull Request (= Merge Request)
   (1) 원격저장소에서 merge를 요청하는것
   (2) GitHub , GitLab , bitbucket 에서 merge request,pull request,merge
      1) merge request :  gitlab
      2) pull request : github , bitbucket
   (3) 개인 branch를  dev branch 로 Merge Request ( Pull Request ) -> merge
   (4) dev branch를 main branch로 Merge Request ( Pull Request ) -> merge

8. Merge : 병합
   (1) 원격저장소의 최신 버전의 코드를 로컬의 코드와 병합
   (2) 로컬에서 개발이 끝난 코드를 원격저장소로 업로드하여 병합
       원격저장소에서 pull request에서 검토 후 승인과정을 거쳐 기준 branch에 병합
   (3) 로컬 브랜치 기준에서   로컬저장소의  다른 로컬 브랜치의 소스를 가져오기
   (4) GitHub , GitLab , bitbucket ,eclipse에서 merge
      1) merge
   (5) 해당 IDE(eclipse, sts4, vs code, intellij IDEA) 에서 merge
      #이클립스  dev브랜치로 합치기
	   Team > Switch to >  DEV 브랜치
       Team > Merge > /feature/supekss 선택 OK
   (6) cmd에서 merge
      #master 브랜치로 병합
         $ git checkout master
         $ git merge {from branch}
         $ git merge feature/supekss

9. Pull
  (1) 서버 remote 에서 로컬로 소스 받기
  (2) 원격 저장소의 데이터를 가져오고, 자동으로 현재 작업하는 로컬 브랜치와 merge
  (3) fetch + merge
  (4) 해당 IDE(eclipse, sts4, vs code, intellij IDEA) 에서 pull
	Team > Synchronize workspace  > Pull
  (5) cmd에서 pull
     $ git pull {원격저장소 이름} {원격저장소에서 받아오고자 하는 브랜치}
     $ git pull
     $ git pull origin master

10. fetch
 (1) 원격저장소의 데이터를 가져오고 로컬 브랜치와 merge하지는 않는다.
 (2) fetch를 하면  원격의 branch를 가져오기

11. Revert
   (1) 작업을 이전상태로 되돌리기
   (2) 이클립스의  소스 및 로컬 저장소에  원격저장소의 소스를 반영
   (3) 작업의 이력을 유지
   (4) 해당 IDE(eclipse, sts4, vs code, intellij IDEA) 에서 revert
       이클립스
      	 Team >  Show in history > 선택 > Revert Commit
     	 Team >  Replace  With > Head Revision : 원격저장소의 최종소스를 반영

12. Reset
   (1) 작업을 이전상태로 되돌리기
   (2) 작업의 이력을 삭제
          	     	  Working Tree 	 Staging Area  	Repository
             	     =========    	=========     =======
     	hard           	취소            	취소                 	취소
    	mixed        	유지          	취소	                    취소
	    soft            	유지	            유지	                    취소
   (3) 해당 IDE(eclipse, sts4, vs code, intellij IDEA) 에서 reset
       이클립스
	 Team >  Reset
	     reset --hard
	     reset --mixed
	     reset --soft

13. Diff
  (1) branch사이에 다른점 또는 작업경로와 로컬저장소의 다른점을 비교
      git diff HEAD  [리모트명/브랜치명]

  (2) cmd에서 diff
      git diff [original branch] [diff branch]

  (3) 해당 IDE(eclipse, sts4, vs code, intellij IDEA) 에서 diff
      Team > Show in History > Compare with Each other

14. Rebase
  (1) 두 branch를 합칠 때 사용한다
  (2) rebase는 branch의 변경사항을 순서대로(commit 순서대로) 다른 branch에 적용하면서 합치고
  (3) merge는 두 branch의 최종결과만 합친다.
  (4) merge보다 깨끗한 히스토리를 만든다.
  (5) 해당 IDE(eclipse, sts4, vs code, intellij IDEA) 에서 rebase
       git rebase <합칠 branch name>

15. 원격저장소 서버에 새로운 브랜치 생성하고 가져오기
   15.1 git 원격 저장소  서버
        supekss_local branch생성
   15.2 eclipse
      (1) remote tracking에 보이게
          eclipse > git repository > 프로젝트 선택 >  pull > remote tracking에 보임
      (2) Check out
          eclipse > git repository > 프로젝트 선택 > 해당 브랜치 선택 > remote tracking > 해당 branch 선택
           > Check out   > Check out as new local branch 를 하면   local branch생성
      (3) Import Project
          eclipse > git repository > 프로젝트 선택 > Import Project
Git Branch 종류
Git Branch는 역할에 따라 Branch를 구분하여 소스코드를 관리하는 방식

(1) Master ( Main ) Branch
  1)  초기 생성되는 Branch이자 최종 서비스로 배포되는 Branch이다.

(2) Release Branch
  1) 개발이 진행되는 Branch이자 이번 버전을 개발하기 위한 Branch이다.

(3) Develop Branch
  1) 개발이 진행되는 Branch이자 다음 버전 개발을 위한 Branch이다.

(4) Feature Branch
  1) 특정 기능을 개발하기 위한 Branch이다.

(5) HotFix Branch
  1) 출시된 버전의 버그를 Fix하기 위한 Branch이다.

거의 실제 프로젝트의 Git Flow 배포에서 Git Remote Repository에 주로 사용하는 Branch 는 Master( Main )와 Dev  Branch,Feature Branch 이다
방법1